Docker: Another introduction
Docker has coined itself as the “world’s leading software container platform”. It is really all about packaging up your software for portability and composability. Yet, containers are not a new thing. The technologies that make up a container are quite old. In this post, we’ll dive into some lower level constructs and work our way up to the features within docker that users can take advantage of.
Processes
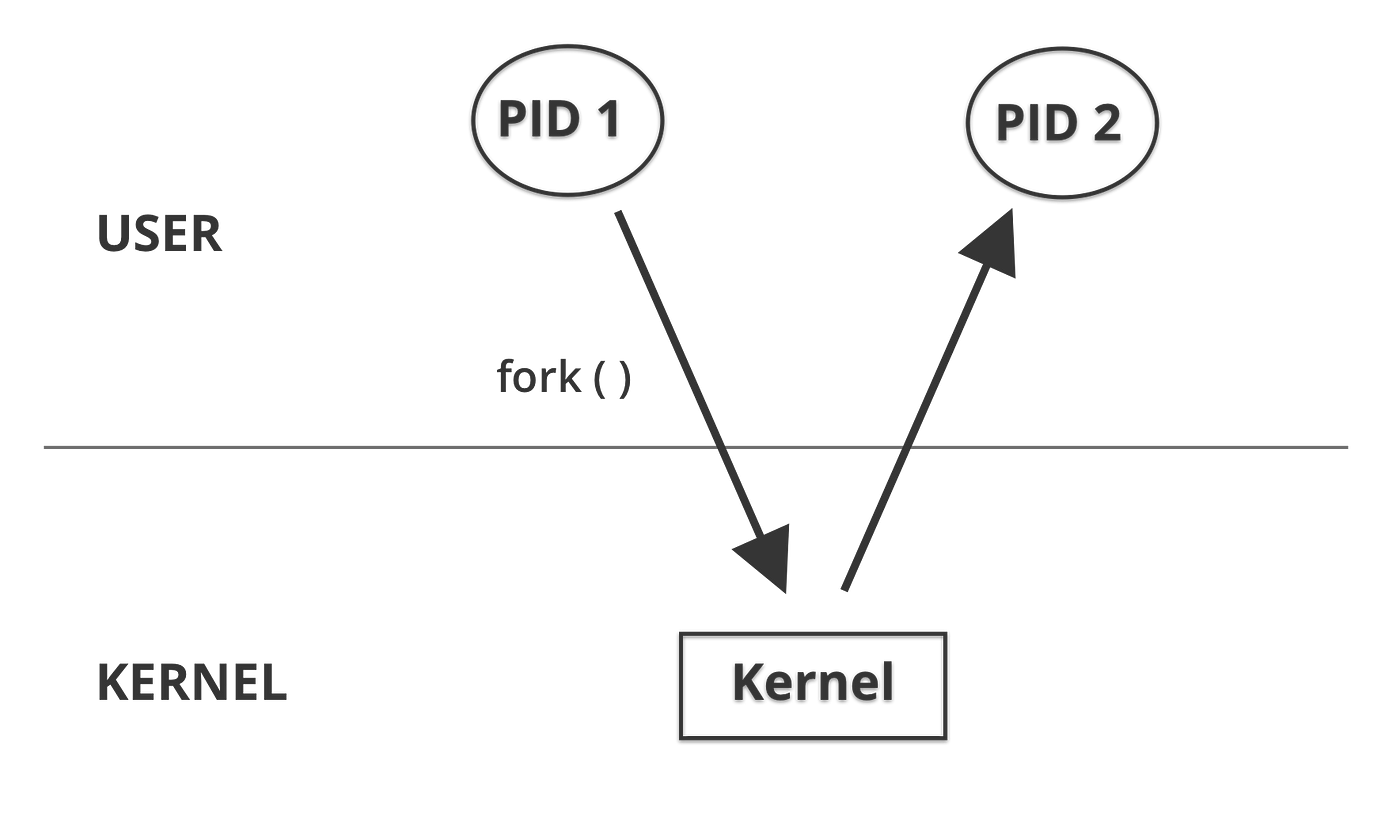
A process is an instance of an executing program. Processes are managed by the operating system kernel which is in charge of allocating resources and managing process creation and interaction (and much more). If we take a quick look and dig into how the linux OS kernel creates a process we will see that, under the covers, the user must make a system call into the kernel using something like clone(2) or fork(2).
If we look into an example, we can create a simple running program and find it’s unique process id. On linux, we can see process information in the /proc directory.
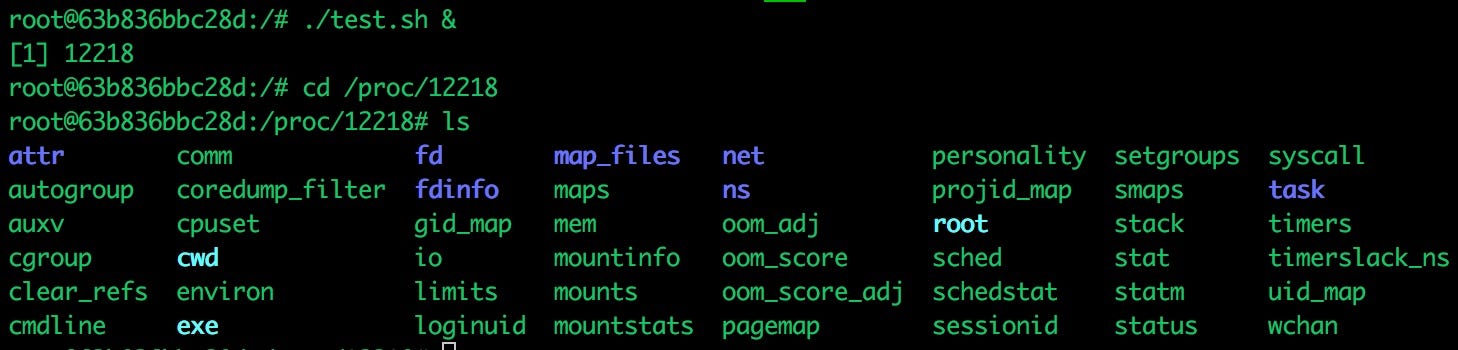
Above we have created a simple shell script that runs in the background. We see that this process is running as PID 12218. We can then navigate to the /proc/12218 directory. Since everything is a “file” in linux, we see some interesting information here related to our process — things like file descriptors, memory and oddly a cgroup file and ns or namespace directory.
Cgroups and Namespaces
Cgroups and namespaces are both linux kernel features that, together, create a way to isolate a process or group of processes to help create this abstraction we call a “container”. Cgroups or control groups are used to limit or monitor the resources of a group of processes. We can see below that at
/sys/fs/cgroupwhat cgroups are setup and administered.

Two obvious cgroup options shown above are cpu and memory. If we look at the options within each, it starts to become more apparent how processes are throttled and limited to the resources they are allowed to use.
Namespaces, on the other hand, isolate what a group of processes have access to within the system. For example, a network namespace allows for different processes to use the same port without conflicting with one another. There is a process id namespace that could allow for multiple processes running PID 1. Or, perhaps, a mount namespace can isolate parts of the file system a group of processes have access to. In order to easily take advantage of these features together to create these abstract containers we need some sort of run-time.
runC
Docker internally uses runC as it’s container run-time. runC is a lightweight, portable container run-time that is merely a CLI tool used to spawn and run containers using the above mentioned kernel features. runC was actually pulled out of docker and donated to the Open Container Initiative (OCI). This group was formed to create standards around container format and, with that, runC follows the OCI run-time specification.
The OCI currently provides 2 container specifications:
- The runtime specification — a specification for managing the lifecycle of a container
- The image format specification — a specification for the container image format
The runc CLI looks similar to docker for those already familiar. It allows you to start, stop, remove containers and much more. In order to run a container using runC you need to follow two options. Either create an OCI bundle from a root filesystem or use a configuration file known as a specs lifecycle operation. This is a configuration file that represents the life of a running container. The latter option gives you more control over a running container. A root file system is merely a snapshot of the filesystem from the root (e.g. / ) and all directories and files. Here’s a simple example:
So with a root file system and expected configuration file we can use runC to spin up a container. If you have docker installed, feel free to mess around with the runc CLI using the runc-playground.
containerd
containerd is available as a daemon and uses runC under the covers to create and spawn containers, but containerd allows you to manage the entire lifecycle of a container. This means containerd can handle image transfer and storage, container execution and supervision, low-level storage and network attachments, etc.
containerd is meant to be embedded in a larger system, like docker engine, but it also comes with a simple CLI tool in ctr. This allows developers to interact with containerd directly for debugging purposes. Since it is written in GO, you can see just how easy it is to interact with it’s API.
Create a new containerd daemon:
containerd.New(“/run/containerd/containerd.sock”)Pull an image (redis) from dockerhub:
client.Pull(ctx, “docker.io/library/redis:alpine”, ...)This shows how easy it is to use containerd’s interface and, as mentioned earlier, this makes it a perfect fit to embed in some higher level abstraction.
Docker engine
If we look back at a summary of the previous sections, we will notice:
- The OS kernel manages the lifecycle of a process and allows for features known as cgroups and namespaces to isolate groups of processes.
- runC is a container run-time that follows the OCI specifications and deals with spawning containers using these kernel features.
- containerd uses runC to spawn containers while also managing the entire lifecycle of a container.
In comes docker engine, an API for users to manage most container needs. Docker deals with the file system, network and creates an easy way to build, maintain and deploy containers. Docker is a client-server application with a CLI tool that interacts with the docker daemon over a simple RESTful API.
If we look back at runC, and more specifically the OCI image specification, we know that we need a root filesystem with some configuration to create a container. With Docker, there is the concept of an image. It is a layered set of these root file systems and acts as a blue print for the container. We could say that you use Docker to build and store images and run containers from a respective image.
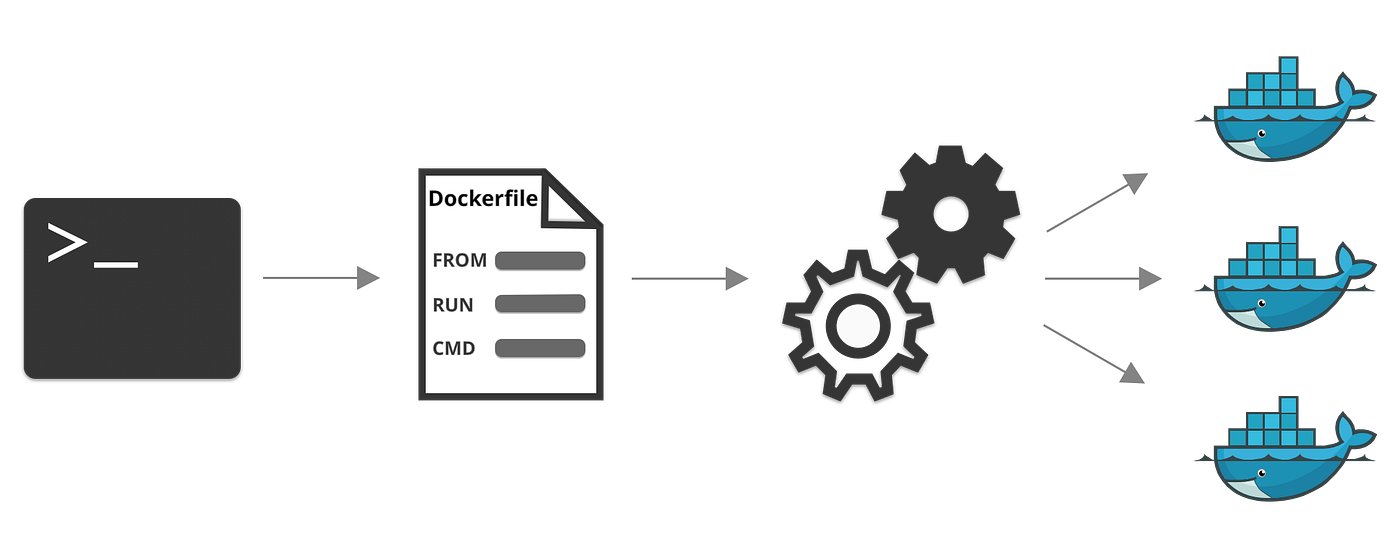
To create these so called images, we use a standard text document known as a Dockerfile. This file gives the docker daemon instructions on how to build these file system layers. Let’s take a look at a Dockerfile example:
FROM ubuntu:xenial
WORKDIR /usr/src/app
RUN apt-get update \
    && apt-get -y install curl git nodejs \
    && cp /usr/bin/js /usr/bin/node \
    && chmod +x /usr/bin/node
COPY source .
CMD node index.js
If we dissect the above, we can see that each line begins with a Docker specific property:
- FROM: The base image used for subsequent instructions. Here we are using the ubuntu xenial base image or root filesystem.
- WORKDIR: The working directory used when this image is built.
- RUN: A set of commands to run when the image is being built. These commands could add files to the image or setup the environment in some specific way.
- COPY: Used to copy files from host/context into the image when being built.
- CMD: The command to run when the container is started.
Let’s use docker to build an image based on the above Dockerfile with the docker cli tool using docker build -t docker-test ..
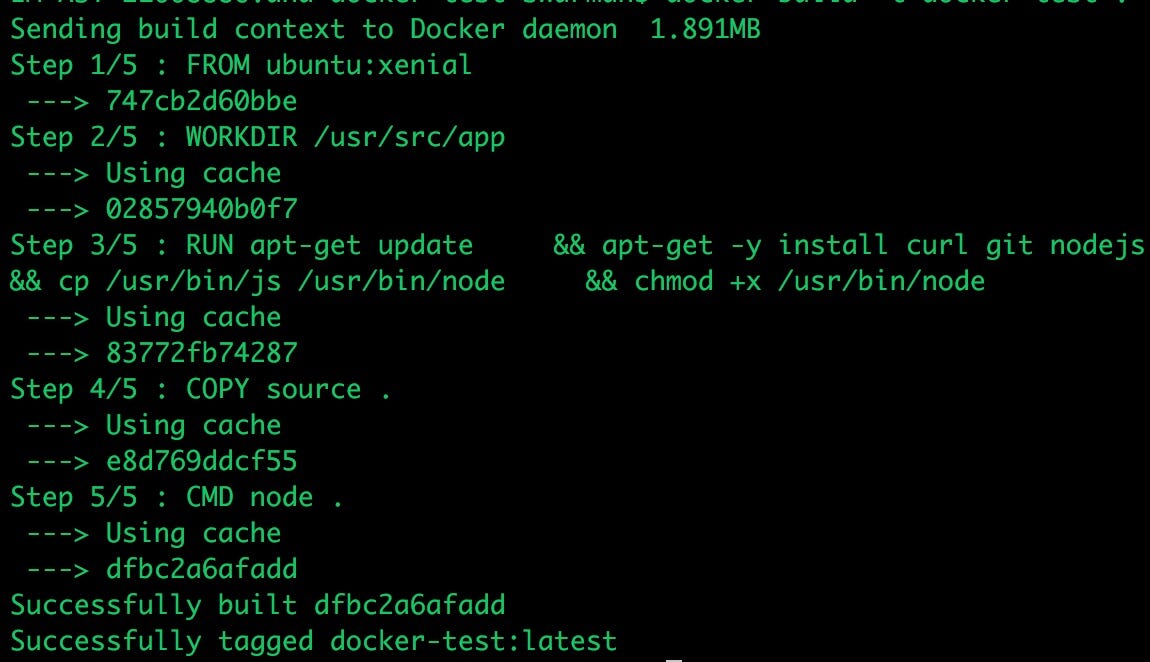
Above we’ve used the docker CLI to build an image tagged docker-test that uses . to reference the current directory as our build context. What the CLI tool does is:
- Use the current directory as the build “context” to send the files within this directory to the docker daemon for processing.
- The docker daemon looks for a Dockerfile as it’s blueprint to build the image from.
- Each instruction in the Dockerfile is a step in the build phase and also a separate image layer (this is important). Each image layer gets it’s own sha hash for easy lookup and potential re-use.
- It’s worth noting that each image layer is just a diff of the image layer before it!
- Finally, apply the command that will be used when the container is started. This would start the node application in this example that is listening on port 8080.
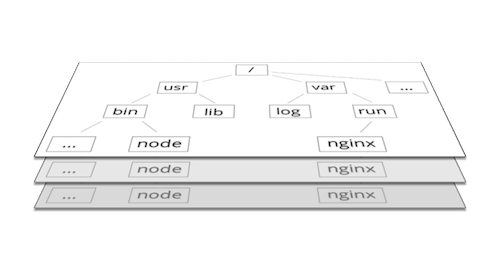
Image layers
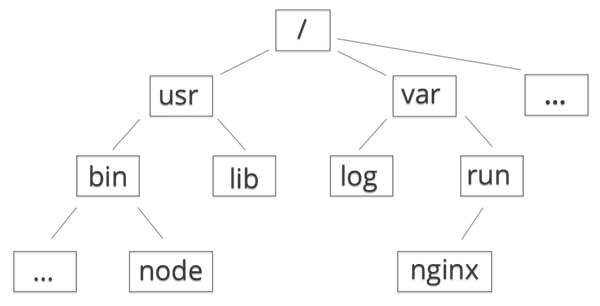
A docker image is an immutable, ordered collection of root filesystem layers. An image layer, therefore, is the modification referenced by an instruction in a Dockerfile used to build a complete image. You can think of an image and it’s corresponding layers visually as a set of tree-like structures of files and folders stacked on top of one another. Noted earlier, each image layer is just a diff of the previous layer before it. This means smaller images and a lighter footprint. Yet, with these benefits comes some overhead. We must maintain these diffs and somehow manage the interaction with these different file system layers.
Storage driver
To focus on efficiency and a small footprint, docker takes advantage of the union file system and copy-on-write functionality.
The union file system is a way to easily combine multiple directories into a single reusable directory. If we visualize file system layers stacked on top of each other, it makes sense to create a way to reuse and combine the contents within any matching directories. We can do just that with the union file system.
Also, these image layers are immutable, meaning read-only, except for the top most layer. This writable layer is the actual “container layer”. It’s important to note that this container layer is ephemeral and any data written to it will be removed when the container exits.
So let’s go back to these image layers — if a container wants to write or alter data, this becomes quite bloated as we have a lot of content from the image layers. What happens during a write is that the container will need to efficiently look to see if the file is available, layer by layer, from a top down approach. If the file exists, cache it for later interaction and then copy the file up to the writable container layer. This way only a diff is needed and this keeps writes efficient.
There are trade-offs in using and accessing files within these layers. In docker, there is the concept of a storage driver. The storage driver is in charge of, not only writes to the container layer, but also how images are stored on the host. Depending on your use case, there are many storage driver options to choose from. You may have large files, many small files, a highly nested file system structure or deep image layer setup. Choosing the right storage driver is important.
Volumes
As you can tell, using a storage driver for all writes comes with some performance overhead. If you have a write-heavy application or want to share the file system between containers then you would want to use a volume. Docker manages volumes on the host to bypass the storage driver and push for writes at native speeds.
Also, since the container layer is ephemeral, we will lose our data once the container exits. Luckily, docker volumes are persisted across container restarts.
Docker compose
Docker compose is a tool that allows us to create a more complex application in an easy-to-use declarative way. Compose allows you to define your application setup using a yaml file. You can manage environment variables, startup order, volumes, the network and much more. Let’s take a look at an example:
version: '3'
services:
  node:
    image: mhart/alpine-node:8
    container_name: node
    ports:
      - 8080:8080
    environment:
      - NODE_PORT=8080
  nginx:
    build:
      context: ./nginx
    container_name: nginx
    ports:
      - 80:80
  redis:
    image: redis:4.0.1-alpine
    container_name: redis
    ports:
      - 6379:6379
    volumes:
      - /etc/redis/database
    environment:
      - REDIS_PASSWORD=pass
Above is an example using nginx, node and redis. If you look at the node section we can see:
- image: The specified image the container will be created from. Based on this reference (mhart/alpine-node:8), docker will go to the public registry and install alpine-node image from mhart namespace with the tag/version of 8.
- container_name: Simply the name of the container will be node for reference.
- ports: We are mapping the host port 8080 to the container port 8080.
- environment: Environment variables available to the the container.
If you take a look at the nginx section, you will see the build property instead of image. What this means is that instead of docker looking for a remote image, it will use the context of the directory specified. Here we see an nginx directory that will be sent to the docker daemon for processing. Likewise, the redis section contains a new volume property. This property sets up a volume for the containers `/etc/redis/database path. This is where redis stores it’s data, meaning it will be faster to interact with this volume and that our data will be available if the container were to die and come back up.
Conclusion
It’s an exciting time to build and deploy software. Docker has taken some old concepts and built a vibrant and active community to deliver an amazing platform. If you made it this far — I’m impressed! This is quite the general introduction of some of the internals within docker and some of the useful features to take advantage of. If you want more content — check out the below links.
Thanks to Ana Spotts for the graphics!
Useful links: